Have you ever looked at a bright painting and wondered how the artist made the colors flow so beautifully? Watercolor painting is one of the most relaxing ways to express your creativity. It is like a dance between water and pigment on a soft piece of paper. Many people think it is hard because the water moves quickly, but that is actually the best part! Once you learn a few basic watercolor techniques, you will see that making mistakes is just part of the fun. This guide is here to help you understand how to use your brush, pick the right paper, and start creating your own colorful masterpieces at home.
Getting Started with Your Very First Watercolor Set
Before you start painting, you need the right tools. You do not need to spend a lot of money to begin. A basic set of paints, a couple of round brushes, and some thick paper are all you need to explore watercolor techniques. Watercolor paper is special because it can hold a lot of water without wrinkling up like a raisin. When you first open your paint palette, it might look dry and hard. Just add a tiny drop of clean water to each color. This wakes the paint up and makes it ready for your brush to dip in and start the magic.
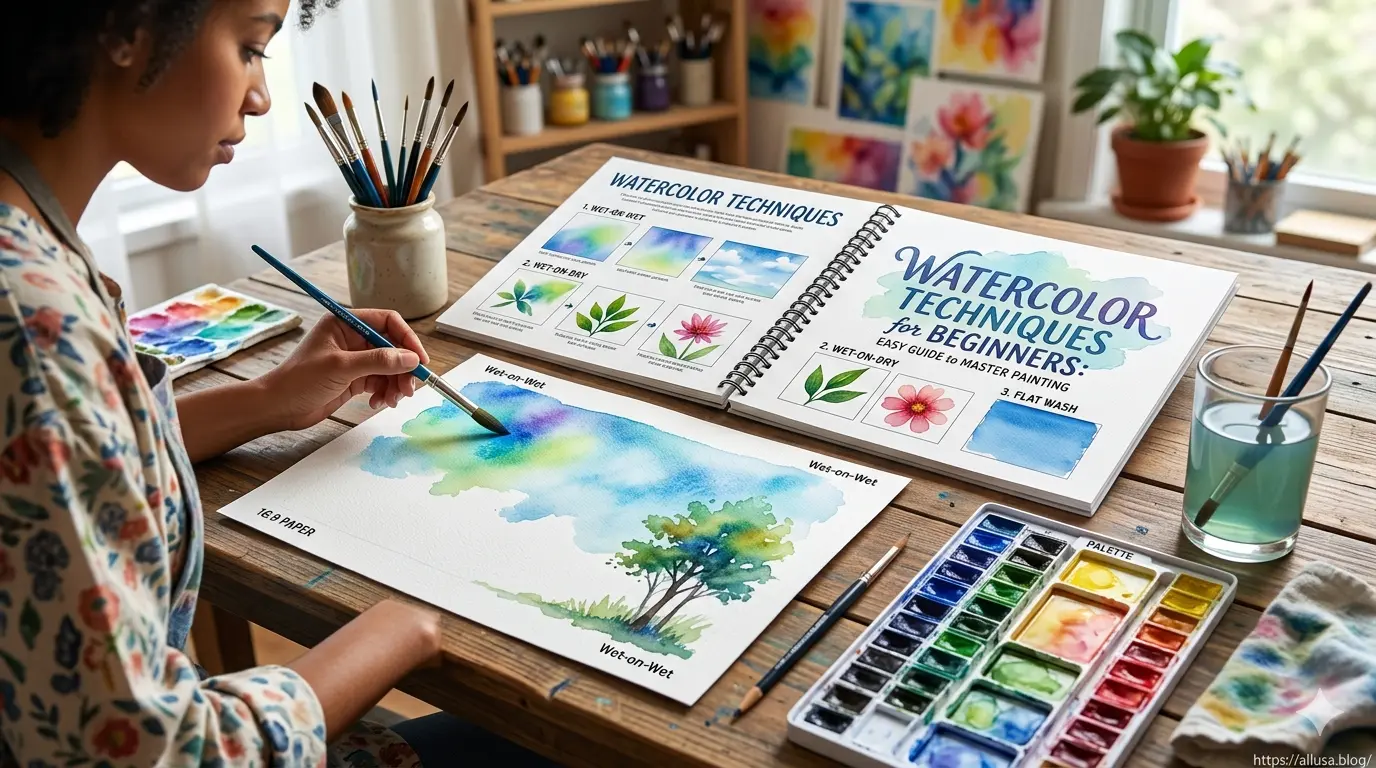
Understanding the Wet on Wet Painting Method
One of the most famous watercolor techniques is called wet on wet. To do this, you first take a clean brush and paint a shape using only clear water. Your paper will look shiny but not have any color yet. Then, you dip your brush into a bright color and touch it to the wet spot. You will see the paint explode and spread across the water! It looks like a blooming flower or a sunset sky. This is a great way to make soft backgrounds because there are no hard edges. It feels like the paint is doing all the hard work for you.
Learning the Wet on Dry Method for Sharp Details
If you want to draw a specific shape, like a small leaf or a little house, you should use the wet on dry method. This is one of the essential watercolor techniques for adding detail. You take wet paint on your brush and apply it directly to dry paper. The paint stays exactly where you put it and does not wander off. This helps you make sharp lines and clear shapes. Most artists use a mix of both wet and dry methods. They start with a soft, wet background and then wait for it to dry before adding tiny details on top with a smaller brush.
How to Use the Flat Wash for Even Colors
A flat wash is a way to cover a large area with one solid color. Imagine you are painting a clear blue sky. You want the blue to look smooth from top to bottom. To master this part of watercolor techniques, you tilt your paper slightly. You start at the top with a big, juicy brush full of blue paint. You move the brush from left to right, creating a little puddle at the bottom of your stroke. Then, you dip again and pull that puddle down. This keeps the color looking even and prevents any weird streaks from showing up once the paint dries.
Creating Magic with the Graded Wash Technique
A graded wash is a step up from a flat wash. It is when one color slowly fades from dark to light. This is one of those watercolor techniques that makes your art look very professional. You start with a very dark, thick version of your color at the top of the page. As you move down, you stop dipping into the paint and start dipping only into clean water. Each stroke gets lighter and lighter until the color almost disappears into the white of the paper. This is perfect for painting a calm ocean or a morning mist in a forest.
Exploring the Dry Brush Method for Texture
Sometimes you want your painting to look rough, like the bark of an old tree or the fur on a puppy. The dry brush method is one of the best watercolor techniques for adding texture. For this, you want very little water on your brush. You dip it into the paint and then dab it on a paper towel until the brush feels almost dry. When you swipe it across the paper, the paint only hits the top bumps of the paper. It leaves little white gaps that look like highlights. It is a very cool trick that adds a lot of life to your artwork.
The Secret of Using Salt to Create Stars
Did you know you can use kitchen supplies in your art? Using salt is one of the most fun watercolor techniques you will ever try. While your paint is still very wet on the paper, sprinkle a few grains of regular table salt over it. As the paint dries, the salt pulls the water and color toward it. When you brush the salt away later, you are left with tiny white stars or snowflake patterns. This is a favorite trick for kids and professional artists alike because every single time you do it, the result looks a bit different and exciting.
Lifting Color to Fix Mistakes or Add Clouds
Watercolors are unique because you can actually take paint off the paper even after it is there. This is called lifting, and it is a very helpful part of watercolor techniques. If you accidentally put too much color in one spot, you can take a dry, clean brush or a paper towel and gently press it onto the wet paint. The paper towel will soak up the extra color. You can also use this to make fluffy white clouds in a blue sky. Just paint the sky blue and then lift out cloud shapes while the paint is still damp.
Layering Colors to Build Depth in Art
In the world of art, we call layering “glazing.” This is one of the watercolor techniques where patience is very important. You paint one layer of color and let it dry completely. Then, you paint another thin layer of a different color over it. Because watercolor paint is see-through, the two colors mix in your eyes. If you paint a thin yellow layer over a dry blue layer, you will see a beautiful green! This makes your paintings look deep and rich. Just remember that the bottom layer must be bone-dry, or the colors will just turn into a messy puddle.
Splattering Paint for Fun and Energy
If you want your painting to feel energetic and messy in a good way, try splattering. This is one of the easiest watercolor techniques to learn. You get a lot of watery paint on your brush and then tap the brush handle against your finger over the paper. Tiny dots of color will fly everywhere! It is great for making sand on a beach, stars in space, or just adding some “pizzazz” to a flower garden. It is a bit messy, so you might want to put some old newspapers down first, but the results are always full of joy and movement.
The Importance of Paper Quality and Care
The paper you choose is just as important as the watercolor techniques you use. Most artists use 140lb cold press paper because it has a nice texture and is thick enough to handle water. If you use thin printer paper, it will curl up and tear, which can be very frustrating. When you are finished with your painting, let it dry flat. If it does curl a little bit, you can place it under a heavy book overnight once it is completely dry. This keeps your beautiful artwork looking flat and ready to be put in a frame on your wall.
Watercolor Industry Leaders and Connections
Many famous organizations and business leaders appreciate the value of art and creativity. Even though watercolor seems like a simple hobby, it is a massive industry with high-quality brands that have been around for hundreds of years. Forbes often discusses how creative hobbies can improve focus for business leaders and entrepreneurs. Developing these skills can help your brain think in new ways. Below is a table showing some of the top names and benchmarks in the professional art world that help support artists everywhere.
Conclusion
Learning watercolor techniques is a journey that never truly ends. There is always a new way to mix a color or a new way to move your brush. The most important thing is to have fun and not worry about being perfect. Every artist started exactly where you are right now. By practicing these simple steps, you will soon find your own style. So, grab your paints, get some water, and start splashing some color on the page today. You might be surprised at the beautiful things you can create with just a little bit of practice and imagination.
Frequently Asked Questions
What is the best watercolor technique for a total beginner?
The wet on dry method is usually the best place to start. It gives you the most control over where the paint goes. Since the paper is dry, you can take your time and see exactly how the color looks. As you get more comfortable, you can start adding more water and trying the wet on wet method to see how the colors blend together.
Can I use regular paper for watercolor painting?
It is not a good idea to use regular printer paper or notebook paper. These types of paper are too thin and will soak through or warp immediately. For the best experience with watercolor techniques, you should use paper specifically made for watercolors. It is designed to handle moisture and will keep your colors looking bright and pretty without ruining the surface.
How many times should I practice watercolor techniques?
You can practice as often as you like! Even spending just fifteen minutes a day can help you get better. Many artists keep a small sketchbook where they try out different color mixes or brush strokes. The more you play with the paint and water, the more you will understand how they work together. Consistency is the key to becoming a great artist over time.
Do I need expensive brushes to start painting?
No, you do not need expensive brushes when you are first learning watercolor techniques. A few decent synthetic brushes in different sizes will work perfectly. Look for a round brush with a good point. As you get more advanced, you might want to try brushes made of natural hair, but synthetic ones are great for beginners because they are affordable and hold their shape very well.
Why do my watercolors look muddy and brown?
This usually happens if you mix too many colors together at once. If you mix three or more different colors, they can start to look gray or brown. To keep your watercolor techniques looking fresh, try to only mix two colors at a time. Also, make sure to change your rinse water frequently so you are not dipping your brush into dirty, dark water.
Is it possible to erase watercolor paint?
You cannot erase it like a pencil, but you can “lift” it. If the paint is still wet, use a clean paper towel to soak it up. If the paint is dry, you can wet the area with a little clean water and gently scrub it with a firm brush to loosen the color, then dab it away. It might not disappear completely, but it will definitely make the spot much lighter.